最近的一个项目中做了这么一个动画, 一个圆弧形的进度条, 有底色、进度色、进度色渐变、圆弧上面还有一个半径比进度条大的显示当前的进度, 要求进度条和当前进度值要随着进度做动画.
实际图: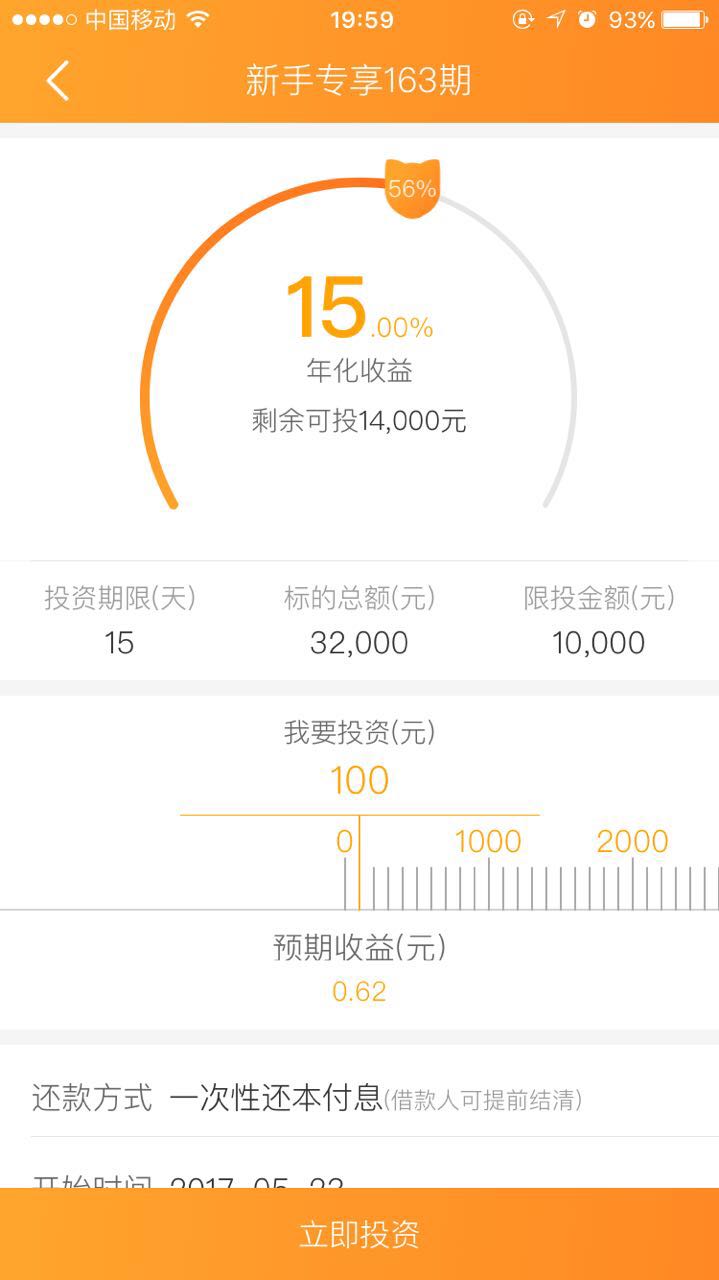
先来说下我的实现
- 一、首先画背景灰色的圆弧
//使用context绘画
CGContextRef context = UIGraphicsGetCurrentContext();
CGContextSetLineCap(context, kCGLineCapRound);
CGContextSetLineJoin(context, kCGLineJoinRound);
CGContextAddArc(context, self.circleCenter.x, self.circleCenter.y, self.radius - self.progressWidth / 2, 5 / 6.0 M_PI, 5 / 6.0 M_PI + 4.0 / 3 M_PI progress, false);
CGContextSetStrokeColorWithColor(context, strokeColor.CGColor);
CGContextSetLineWidth(context, lineWidth);
CGContextStrokePath(context);
//或者使用UIBezierPath绘画
UIBezierPath *path = [UIBezierPath bezierPathWithArcCenter:self.circleCenter radius:self.radius - self.progressWidth / 2 startAngle:5 / 6.0 M_PI endAngle:5 / 6.0 M_PI + 4.0 / 3 M_PI progress clockwise:true];
[strokeColor set];
[path setLineWidth:lineWidth];
[path stroke];
- 二、然后实现渐变色的弧形进度条
渐变色的进度条是在layer里面添加一个子layerA(CALayer对象), 在子layer里面添加两个子layerB、layerC(CAGradientLayer对象) , 然后设置一个layerD(CAShapeLayer对象)作为遮罩.
//实现
[self.layer addSublayer:self.layerA];
[self.layerA insertSublayer:self.layerB atIndex:0];
[self.layerA insertSublayer:self.layerC atIndex:1];
self.layerA.mask = self.layerD
//self.layerB的frmae是self.layerA的左半部分, self.layerC的frame是self.layerA的右半部分.
self.layerB.frame = CGRectMake(0, 0, rect.size.width / 2, rect.size.height);
self.layerC.frame = CGRectMake(rect.size.width / 2, 0, rect.size.width / 2, rect.size.height);
- 三、动画的实现
最开始做动画, 是使用CAAnimation来实现, 对于进度条使用CABasicAnimation动画
CABasicAnimation *object = [CABasicAnimation animationWithKeyPath:@”strokeEnd”];
//设置动画结束不移除
object.removedOnCompletion = false;
//动画渐进渐出
object.timingFunction=[CAMediaTimingFunction functionWithName:kCAMediaTimingFunctionEaseInEaseOut];
//保持状态
object.fillMode = kCAFillModeForwards;
//设置动画的结束位置
object.strokeEnd = progress;
[self.layerD addAnimation:object forKey:@”progressAnimation”]
对于上面的56%使用CAKeyframeAnimation动画:
CAKeyframeAnimation *object = [CAKeyframeAnimation animationWithKeyPath:@”position”];
//设置动画结束不移除
object.removedOnCompletion = false;
//动画渐进渐出
object.timingFunction=[CAMediaTimingFunction functionWithName:kCAMediaTimingFunctionEaseInEaseOut];
//保持状态
object.fillMode = kCAFillModeForwards;
//设置动画的路径
object.path = [UIBezierPath bezierPathWithArcCenter:self.circleCenter radius:self.radius - self.progressWidth / 2 startAngle:-7 / 6.0 * M_PI endAngle:-7 / 6.0 * M_PI + 4 / 3.0 * M_PI * progress clockwise:true].CGPath;
[self.thumbImageV addAnimation:object forKey:@”thumbAnimation”]
- 四、存在的问题
第一: 动画时间不一致问题
这个问题主要由于更改CAShapeLayer的strokeEnd, 系统默认会有一个动画, 所以需要移除这个动画, 其他属性还有fillEnd、strokeStart等
在添加动画之前调用[self.layerD removeAllAnimations]即可解决这个动画时间不同步的问题
第二: 这个页面所在的控制器使用侧滑的时候, 做动画的两个控件会消失不见
这个问题主要是由于动画做的实际是假象, 实际位置还是在初始位置, 解决方案有: - 禁用这个控制器的侧滑功能, 但是用户体验不好, 实现方法传送门
在动画结束后更改做动画的控制的位置为动画完成之后位置在
(void)animationDidStop:(CAAnimation *)anim finished:(BOOL)flag方法里面实现更改位置五、最终解决方案
最后使用CADisplayLink动态改变self.layerD.strokeEnd和thumbImageV的center来实现, 完美解决问题:
self.layerD.strokeEnd = self.currentProgress;
self.thumbImageV.center = [self getCenterPointWithProgress:self.currentProgress];
//根据进度获取圆弧上面的坐标
-(CGPoint)getCenterPointWithProgress:(float)progress {
CGFloat angle = -(7 / 6.0 * M_PI - 4 / 3.0 * M_PI * progress);//将进度转换成弧度
CGFloat x2 = self.circleCenter.x + (self.radius - self.progressWidth / 2) * cosf(angle);
CGFloat y2 = self.circleCenter.y + (self.radius - self.progressWidth / 2) * sinf(angle);
return CGPointMake(x2, y2);
}